This past Thursday the ASP.NET MVC feature team published a new "Preview 5" release of the ASP.NET MVC framework. You can download the new release here. This "Preview 5" release works with both .NET 3.5 and the recently released .NET 3.5 SP1. It can also now be used with both Visual Studio 2008 as well as (the free) Visual Web Developer 2008 Express SP1 edition (which now supports both class library and web application projects).
Preview 5 includes a bunch of new features and refinements (these build on the additions in "Preview 4"). You can read detailed "Preview 5" release notes that cover changes/additions here. In this blog post I'm going to cover one of the biggest areas of focus with this release: form posting scenarios. You can download a completed version of the application I'll build below here.
Basic Form Post with a Web MVC Pattern
Let's look at a simple form post scenario - adding a new product to a products database:

The page above is returned when a user navigates to the "/Products/Create" URL in our application. The HTML form markup for this page looks like below:

The markup above is standard HTML. We have two <input type="text"/> textboxes within a <form> element. We then have an HTML submit button at the bottom of the form. When pressed it will cause the form it is nested within to post the form inputs to the server. The form will post the contents to the URL indicated by its "action" attribute - in this case "/Products/Save".
Using the previous "Preview 4" release of ASP.NET we might have implemented the above scenario using a ProductsController class like below that implements two action methods - "Create" and "Save":

The "Create" action method above is responsible for returning an html view that displays our initial empty form. The "Save" action method then handles the scenario when the form is posted back to the server. The ASP.NET MVC framework automatically maps the "ProductName" and "UnitPrice" form post values to the method parameters on the Save method with the same names. The Save action then uses LINQ to SQL to create a new Product object, assigns its ProductName and UnitPrice values with the values posted by the end-user, and then attempts to save the new product in the database. If the product is successfully saved, the user is redirected to a "/ProductsAdded" URL that will display a success message. If there is an error we redisplay our "Create" html view again so that the user can fix the issue and retry.
We could then implement a "Create" HTML view template like below that would work with the above ProductsController to generate the appropriate HTML. Note below that we are using the Html.TextBox helper methods to generate the <input type="text"/> elements for us (and automatically populate their value from the appropriate property in our Product model object that we passed to the view):

Form Post Improvements with Preview 5
The above code works with the previous "Preview 4" release, and continues to work fine with "Preview 5". The "Preview 5" release, though, adds several additional features that will allow us to make this scenario even better.
These new features include:
- The ability to publish a single action URL and dispatch it differently depending on the HTTP Verb
- Model Binders that allow rich parameter objects to be constructed from form input values and passed to action methods
- Helper methods that enable incoming form input values to be mapped to existing model object instances within action methods
- Improved support for handling input and validation errors (for example: automatically highlighting bad fields and preserving end-user entered form values when the form is redisplayed to the user)
I'll use the remainder of this blog post to drill into each of these scenarios.
[AcceptVerbs] and [ActionName] attributes
In our sample above we implemented our product add scenario across two action methods: "Create" and "Save". One motivation for partitioning the implementation like this is that it makes our Controller code cleaner and easier to read.
The downside to using two actions in this scenario, though, is that we end up publishing two URLs from our site: "/Products/Create" and "/Products/Save". This gets problematic in scenarios where we need to redisplay the HTML form because of an input error - since the URL of the redisplayed form in the error scenario will end up being "/Products/Save" instead of "/Products/Create" (because "Save" that was the URL the form was posted to). If an end-user adds this redisplayed page to their browser favorites, or copy/pastes the URL and emails it to a friend, they will end up saving the wrong URL - and will likely have an error when they try and access it later. Publishing two URLs can also cause problems with some search engines if your site is crawled and they attempt to automatically traverse your action attributes.
One way to work around these issues is to publish a single "/Products/Create" URL, and then have different server logic depending on whether it is a GET or POST request. One common approach used to-do this with other web MVC frameworks is to simply have a giant if/else statement within the action method and branch accordingly:

The downside with the above approach, though, is that it can make the action implementation harder to read, as well as harder to test.
ASP.NET MVC "Preview 5" now offers a better option to handle this scenario. You can create overloaded implementations of action methods, and use a new [AcceptVerbs] attribute to have ASP.NET MVC filter how they are dispatched. For example, below we can declare two Create action methods - one that will be called in GET scenarios, and one that will be called in POST scenarios:
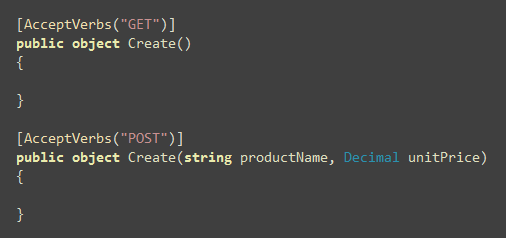
This approach avoids the need for giant "if/else" statement within your action methods, and enables a cleaner structuring of your action logic. It also eliminates the need to mock the Request object in order to test these two different scenarios.
You can also optionally now use a new [ActionName] attribute to allow the method name implementation on your controller class to be different than that from the published URL. For example, if rather than having two overloaded Create methods in your controller you instead wanted to have the POST method be named "Save", you could apply the [ActionName] attribute to it like so:
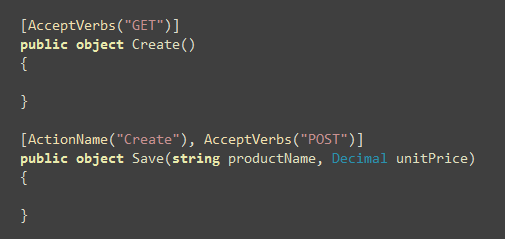
Above we have the same controller method signature (Create and Save) that we had in our initial form post sample. The difference, though, is that we are now publishing a single URL (/Products/Create) and are automatically varying the handling based on the incoming HTTP verb (and so are browser favorites and search engine friendly).
Model Binders
In our sample above the signature of the Controller action method that handles the form-post takes a String and a Decimal as method arguments. The action method then creates a new Product object, assigns these input values to it, and then attempts to insert it into the database:

One of the new capabilities in "Preview 5" that can make this scenario cleaner is its "Model Binder" support. Model Binders provide a way for complex types to be de-serialized from the incoming HTTP input, and passed to a Controller action method as arguments. They also provide support for handling input exceptions, and make it easier to redisplay forms when errors occur (without requiring the end-user to have to re-enter all their data again - more on this later in this blog post).
For example, using the model binder support we could re-factor the above action method to instead take a Product object as an argument like so:

This makes the code a little more terse and clean. It also allows us to avoid having repetitive form-parsing code scattered across multiple controllers/actions (allowing us to maintain the DRY principle: "don't repeat yourself").
Registering Model Binders
Model Binders in ASP.NET MVC are classes that implement the IModelBinder interface, and can be used to help manage the binding of types to input parameters. A model binder can be written to work against a specific object type, or can alternatively be used to handle a broad range of types. The IModelBinder interface allows you to unit test binders independent of the web-server or any specific controller implementation.
Model Binders can be registered at 4 different levels within an ASP.NET MVC application, which enables a great deal of flexibility in how you use them:
1) ASP.NET MVC first looks for the presence of a model binder declared as a parameter attribute on an action method. For example, we could indicate that we wanted to use a hypothetical "Bind" binder by annotating our product parameter using an attribute like below (note how we are indicating that only two properties should be bound using a parameter on the attribute):

Note: "Preview 5" doesn't have a built-in [Bind] attribute like above just yet (although we are considering adding it as a built-in feature of ASP.NET MVC in the future). However all of the framework infrastructure necessary to implement a [Bind] attribute like above is now implemented in preview 5. The open source MVCContrib project also has a DataBind attribute like above that you can use today.
2) If no binder attribute is present on the action parameter, ASP.NET MVC then looks for the presence of a binder registered as an attribute on the type of the parameter being passed to the action method. For example, we could register an explicit "ProductBinder" binder for our LINQ to SQL "Product" object by adding code like below to our Product partial class:

3) ASP.NET MVC also supports the ability to register binders at application startup using the ModelBinders.Binders collection. This is useful when you want to use a type written by a third party (that you can't annotate) or if you don't want to add a binder attribute annotation on your model object directly. The below code demonstrates how to register two type-specific binders at application startup in your global.asax:

4) In addition to registering type-specific global binders, you can use the ModelBinders.DefaultBinder property to register a default binder that will be used when a type-specific binder isn't found. Included in the MVCFutures assembly (which is currently referenced by default with the mvc preview builds) is a ComplexModelBinder implementation that uses reflection to set properties based on incoming form post names/values. You could register it to be used as the fallback for all complex types passed as Controller action arguments using the code below:

Note: the MVC team plans to tweak the IModelBinder interface further for the next drop (they recently discovered a few scenarios that necessitate a few changes). So if you build a custom model binder with preview 5 expect to have to make a few tweaks when the next drop comes out (probably nothing too major - but just a heads up that we know a few arguments will change on its methods).
UpdateModel and TryUpdateModel Methods
The ModelBinder support above is great for scenarios where you want to instantiate new objects and pass them in as arguments to a controller action method. There are also scenarios, though, when you want to be able to bind input values to existing object instances that you own retrieving/creating yourself within the action method. For example, when enabling an edit scenario for an existing product in the database, you might want to use an ORM to retrieve an existing product instance from the database first within your action method, then bind the new input values to the retrieved product instance, and then save the changes back to the database.
"Preview 5" adds two new methods on the Controller base class to help enable this - UpdateModel() and TryUpdateModel(). Both allow you to pass in an existing object instance as the first argument, and then as a second argument you pass in a security white-list of properties you want to update on them using the form post values. For example, below I'm retrieving a Product object using LINQ to SQL, and then using the UpdateModel method to update the product's name and price properties with form data.

The UpdateModel methods will attempt to update all of the properties you list (even if there is an error on an early one in the list). If it encounters an error for a property (for example: you entered bogus string data for a UnitPrice property which is of type Decimal), it will store the exception object raised as well the original form posted value in a new "ModelState" collection added with "Preview 5". We'll cover this new ModelState collection in a little bit - but in a nutshell it provides an easy way for us to redisplay forms with the user-entered values automatically populated for them to fix when there is an error.
After attempting to update all of the indicated properties, the UpdateModel method will raise an exception if any of them failed. The TryUpdateModel method works the same way - except that instead of raising an exception it will return a boolean true/false value which indicates whether there were any errors. You can choose whichever method works best with your error handling preferences.
Product Edit Example
To see an example of using the UpdateModel method in use, let's implement a simple product editing form. We'll use a URL format of /Products/Edit/{ProductId} to indicate which product we want to edit. For example, below the URL is /Products/Edit/4 - which means we are going to edit the product whose ProductId is 4:

Users can change the product name or unit price, and then click the Save button. When they do our post action method will update the database and then show the user a "Product Updated!" message if it was successful:

We can implement the above functionality using the two Controller actions methods below. Notice how we are using the [AcceptVerbs] attribute to differentiate the Edit action that displays the initial form, and the one that handles the form post submission:
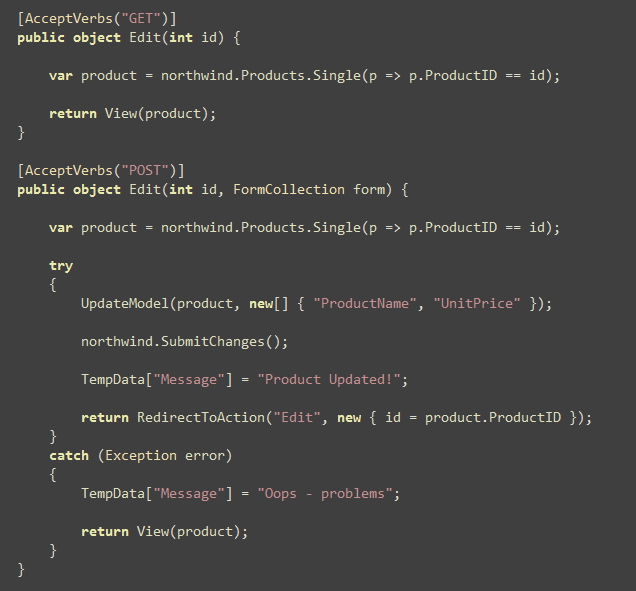
Our POST action method above uses LINQ to SQL to retrieve an instance of the product object we are editing from the database, then uses UpdateModel to attempt to update the product's ProductName and UnitPrice values using the form post values. It then calls SubmitChanges() on the LINQ to SQL datacontext to save the updates back to the database. If that was successful, we then store a success message string in the TempData collection and redirect the user back to the GET action method using a client-side redirect (which will cause the newly saved product to be redisplayed - along with our TempData message string indicating it was updated). If there is an error either with the form posted values, or with updating the database, an exception will be raised and caught in our catch block - and we will redisplay the form view again to the user for them to fix.
You might wonder - what is up with this redirect when we are successful? Why not just redisplay the form again and show the success message? The reason for the client-redirect is to ensure that if the user hits the refresh button after successfully pressing the save button, they don't resubmit the form again and get hit with a browser prompt like this:
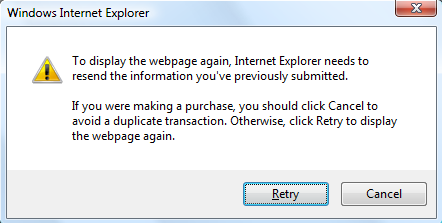
Doing the redirect back to the GET version of the action method ensures that a user hitting refresh will simply reload the page again and not post back. This approach is called the "Post/Redirect/Get" (aka PRG) pattern. Tim Barcz has a nice article here that talks about this more with ASP.NET MVC.
The above two controller action methods are all we need to implement in order to handle editing and updating a Product object. Below is the "Edit" view to go with the above Controller:
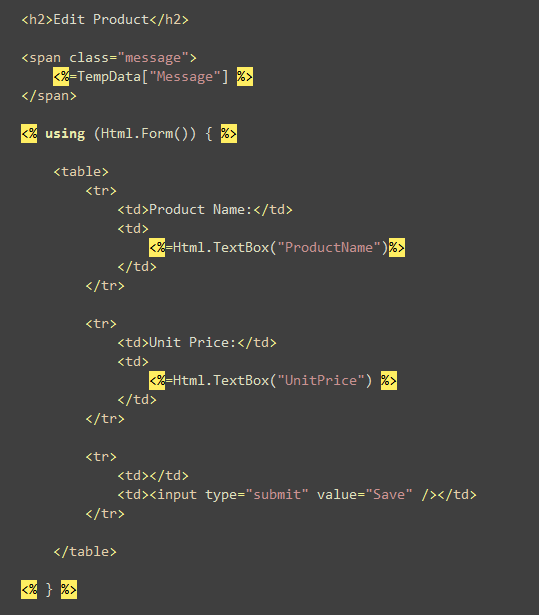
Useful Tip: In the past once you started added parameters to URLs (for example: /Products/Edit/4) you had to write code in your view to update the form's action attribute to include the parameters in the post URL. "Preview 5" includes a Html.Form() helper method that can make this easier. Html.Form() has many overloaded versions that allow you to specify a variety of parameter options. A new overloaded Html.Form() method that takes with no parameters has been added that will now output the same URL as the current request.
For example, if the incoming URL to the Controller that rendered the above view was "/Products/Edit/5", calling Html.Form() like above would automatically output <form action="/Products/Edit/5" method="post"> as the markup output. If the incoming URL to the Controller that rendered the above view was "/Products/Edit/55", calling Html.Form() like above would automatically output <form action="/Products/Edit/55" method="post"> as the markup output. This provides a nifty way to avoid having to write any custom code yourself to construct the URL or indicate parameters.
Unit Testing and UpdateModel
In this week's Preview 5 drop the UpdateModel methods always work against the Request object's Form post collection to retrieve values. This means that to test the above form post action method you'd need to mock the request object in your unit test.
With the next MVC drop we'll also add an overloaded UpdateModel method that allows you to pass in your own collection of values to use instead. For example, we would be able to use the new FormCollection type in preview 5 (which has a ModelBuilder that automatically populates it with all form post values) and pass it to the UpdateModel method as an argument like so:

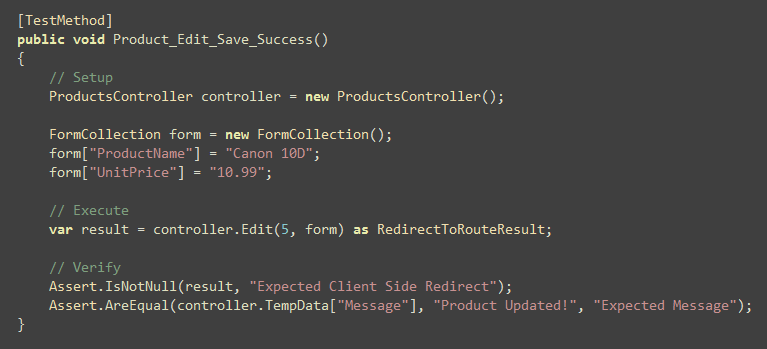
Using an approach like above will allow us to unit test our form-post scenario without having to use any mocking. Below is an example unit test we could write that tests that a POST scenario successfully updates with new values and redirects back to the GET version of our action method. Notice that we do not need to mock anything (nor do we have to rely on any special helper methods) in order to unit test all the functionality in our controller:
Handling Error Scenarios - Redisplaying Forms with Error Messages
One of the important things to take care of when handling form post scenarios are error conditions. These includes cases where an end-user posts incorrect input (for example: a string instead of a number for a Decimal unit-price), as well as cases where the input format is valid, but the business rules behind the application disallow something from being created/updated/saved (for example: making a new order for a discontinued product).
If a user makes a mistake when filling out a form, the form should be redisplayed with informative error messages that guide them towards fixing it. The form should also preserve the input data the user originally entered - so that they don't have to refill this manually. This process should repeat as many times as necessary until the form successfully completes.
Basic Form Entry Error Handling and Input Validation with ASP.NET MVC
In our product edit sample above we haven't written much error handling code in either our Controller or our View. Our Edit post action simply wraps a try/catch error handling block around the UpdateModel() input mapping call, as well as the database save SubmitChanges() call. If an error occurs, the controller saves an output message in the TempData collection, and then returns our edit view to be redisplayed:
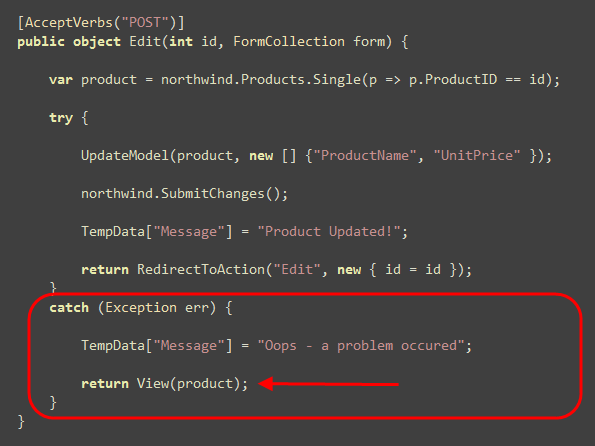
With earlier preview releases of ASP.NET MVC the above code wouldn't be enough to deliver a good end-user experience (since it wouldn't highlight the problem, nor preserve user input if there was an error).
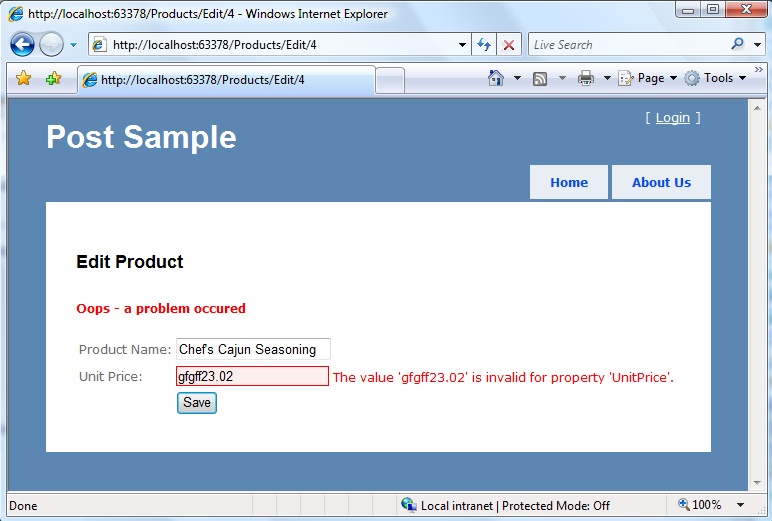
However, with "Preview 5" you'll find that you now get a decent end-user error experience out of the box with just the above code. Specifically, you'll find that when our edit view is redisplayed because of an input error it now highlights all input controls that have problems, and preserves their input for us to fix:
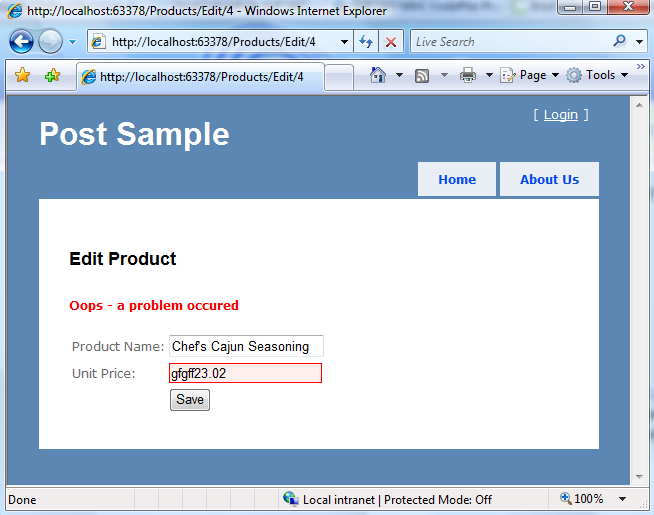
How, you might ask, did the Unit Price textbox highlight itself in red and know to output the originally entered user value?
"Preview 5" introduces a new "ModelState" collection that is passed as part of the "ViewData" sent from the Controller to the View when it renders. The ModelState collection provides a way for Controllers to indicate that an error exists with a model object or model property being passed to the View, and allows a human friendly error message to be specified that describes the issue, as well as the original value entered by the end-user.
Developers can explicitly write code to add items into the ModelState collection within their Controller actions. ASP.NET MVC's ModelBinders and UpdateModel() helper methods also automatically populate this collection by default when they encounter input errors. Because we were using the UpdateModel() helper method in our Edit action above, when it failed in its attempt to map the UnitPrice TextBox's "gfgff23.02" input to the Product.UnitPrice property (which is of type Decimal) it automatically added an entry to the ModelState collection.
Html helper methods inside the View by default now check the ModelState collection when rendering output. If an error for an item they are rendering exists, they will now render the originally entered user value as well as a CSS error class to the HTML input element. For example, for our "Edit" View above we are using the Html.TextBox() helper method to render the UnitPrice of our Product object:
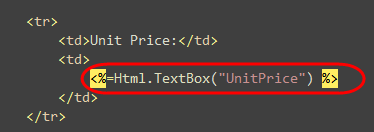
When the view was rendered during the error scenario above the Html.TextBox() method checked the ViewData.ModelState collection to see if there were any issues with the "UnitPrice" property of our Product object, and when it saw that there was rendered the originally entered user input ("gfgff23.02") and added a css class to the <input type="textbox"/> it output:

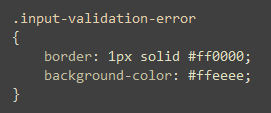
You can customize the appearance of the the error css classes to look however you want. The default CSS error rule for input elements in the stylesheet created in new ASP.NET MVC projects looks like below:
Adding Additional Validation Messages
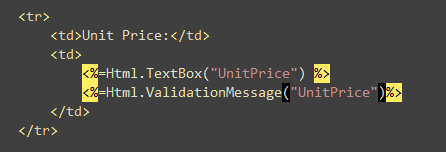
The built-in HTML form helpers provide basic visual identification of input fields with issues. Let's now add some more descriptive error messages to the page as well. To-do this we can use the new Html.ValidationMessage() helper method in "Preview 5". This method will output the error message in the ModelState collection that is associated with a given Model or Model property.
For example: we could update our view to use the Html.ValidationMessage() helper to the right of the textboxes like so:
Now when the page renders with an error, an error message will be displayed next to the fields with problems:
There is an overloaded version of the Html.ValidationMessage() method that takes a second parameter that allows the view to specify an alternative text to display:

One common use case is to output the * character next to the input fields, and then add the new Html.ValidationSummary() helper method (new in "Preview 5") near the top of the page to list all the error messages:
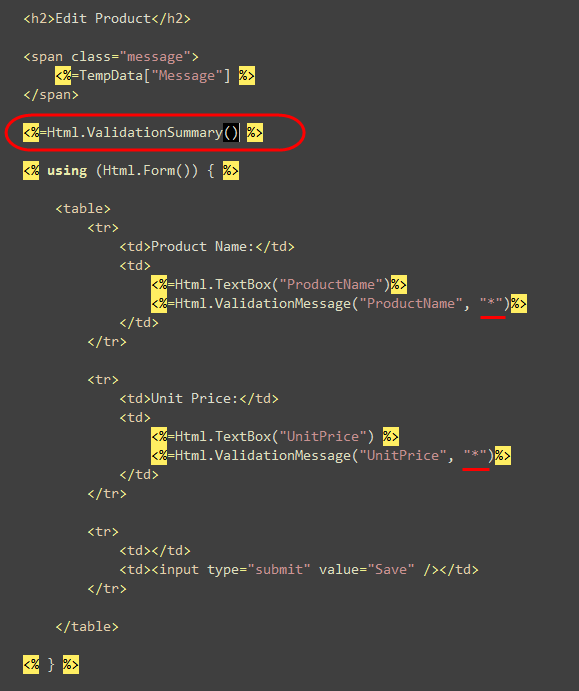
The Html.ValidationSummary() helper method will then render a <ul><li></ul> list of all the error messages our ModelState collection, and a * and red border will indicate each input element that has a problem:
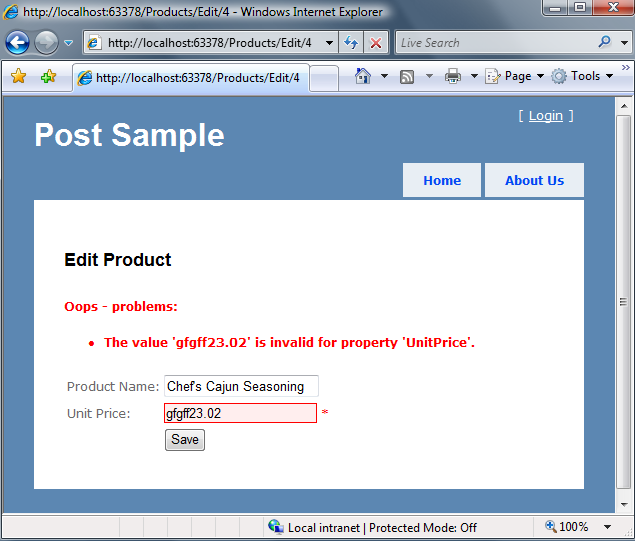
Note that we haven't had to change our ProductsController class at all to achieve this.
Supporting Business Rules Validation
Supporting input validation scenarios like above is useful, but rarely sufficient for most applications. In most scenarios you also want to be able to enforce business rules, and have your application UI cleanly integrate with them.
ASP.NET MVC supports any data layer abstraction (both ORM and non-ORM based), and allows you to structure your domain model, as well as associated rules/constraints, however you want. Capabilities like Model Binders, the UpdateModel helper method, and all of the error display and validation message support are explicitly designed so that you can use whatever preferred data access story you want within your MVC applications (including LINQ to SQL, LINQ to Entities, NHibernate, SubSonic, CSLA.NET, LLBLGen Pro, WilsonORMapper, DataSets, ActiveRecord, and any other).
Adding Business Rules to a LINQ to SQL Entity
In the sample above I've been using LINQ to SQL to define my Product entity and perform my data access. So far, the only level of domain rules/validation that I am using on my Product entity are those inferred by LINQ to SQL from the SQL Server metadata (nulls, data type and length, etc). This will catch scenarios like above (where we are trying to assign bogus input to a Decimal). However, they won't be able to model business issues that can't be easily declared using SQL metadata. For example: disallowing the reorder level of a product to be greater than zero if it has been discontinued, or disallowing a product to be sold for less than what our supplier price is, etc. For scenarios like these we need to add code to our model to express and integrate these business rules.
The wrong place to add this business rule logic is in the UI layer of our application. Adding them there is bad for many reasons. Among others it will almost certainly lead to duplicated code - since you'll end up copying the rules around from UI to UI and from form to form. In addition to being time-consuming, there is an excellent chance doing so will lead to bugs when you change your business rule logic, and you forget to update it everywhere.
A much better place to incorporate these business rules is at your model or domain level. That way they can be used and applied regardless of what type of UI or form or service works with it. Changes to the rules can be made once, and picked up everywhere without having to duplicate any logic.
There are several patterns and approaches we could take to integrate richer business rules to the Product model object we've been using above: we could define the rules within the object, or external from the object. We could use declarative rules, a re-usable rules engine framework, or imperative code. The key point is that ASP.NET MVC allows us to use any or all of these approaches (there aren't a bunch of features that require you to always do it one way - you instead have the flexibility to reflect them however you want, and the MVC features are extensible enough to integrate with almost anything).
For this blog post I'm going to use a relatively simple rules approach. First I'm going to define a "RuleViolation" class like below that we can use to capture information about a business rule that is being violated within our model. This class will expose an ErrorMessage string with details about the error, as well as expose the primary property name and property value associated with it that is causing the violation:
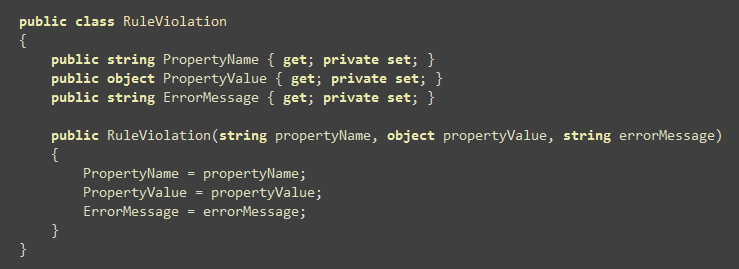
(note: For simplicity sake I'm only going to store only one property - in more complex applications this might instead be a list so that multiple properties could be specified).
I will then define an IRuleEntity interface that has a single method - GetRuleViolations() - which returns back a list of all current business rule violations with that entity:

I can then have my Product class implement this interface. To keep the sample simple I'm embedding the rule definition and evaluation logic inside the method. There are better patterns that you can use to enable reusable rules, as well as to handle more complex rules. If this sample grew I'd refactor the method so that the rules and their evaluation where defined elsewhere, but for now to keep this simple we'll just evaluate three business rules below like so:
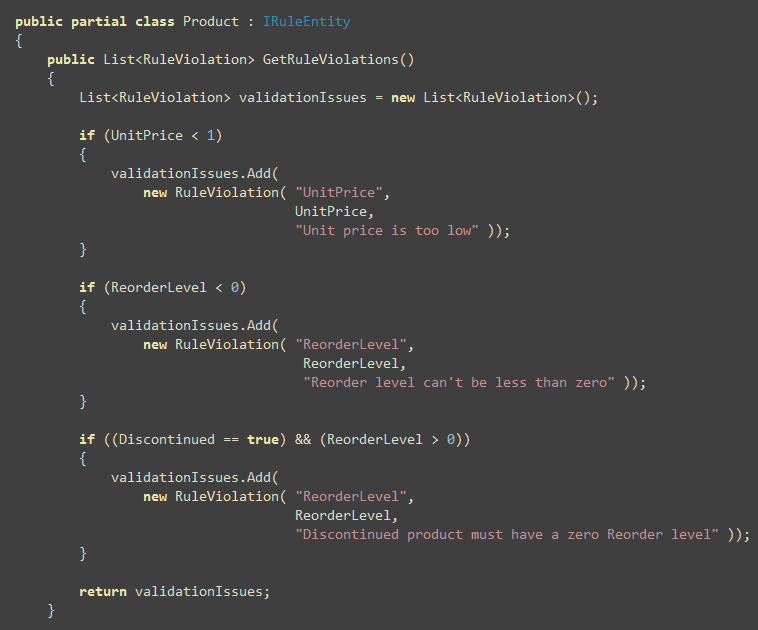
Our application can now query the Product (or any other IRuleEntity) instance to check its current validation status, as well as retrieve back RuleViolation objects that can be used to help present UI that can guide an end-user of the application to help fix them. It also allows us to easily unit test our business rules independent of the application UI.
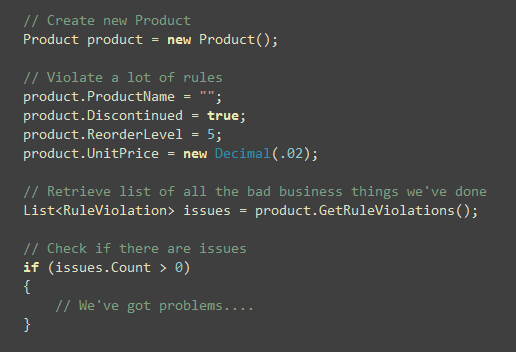
For this particular sample I am going to choose to enforce that our Product object is never saved in the database in an invalid state (meaning all RuleViolations must be fixed before the Product object can be saved in the database). We can do this with LINQ to SQL by adding an OnValidate partial method to the Product partial class. This method will get called automatically by LINQ to SQL any time database persistence occurs. Below I'm calling the GetRuleViolations() method we added above, and am raising an exception if there are unresolved errors. This will abort the transaction and prevent the database from being updated:

And now in addition to having a friendly helper method that allows us to retrieve RuleViolations from a Product, we have enforcement that those RuleViolations must be fixed before our database is ever updated.
Integrating the above Rules into our ASP.NET MVC UI
Once we've implemented our business rules, and exposed our RuleViolations like above, it will be relatively easy to integrate it into our ASP.NET MVC sample.
Because we added the OnValidate partial method to our Product class, calling northwind.SubmitChanges() will raise an exception if there are any business rule validation issues with a Product object that we are trying to save. This exception will abort any database transactions, and will be caught in our catch block below:
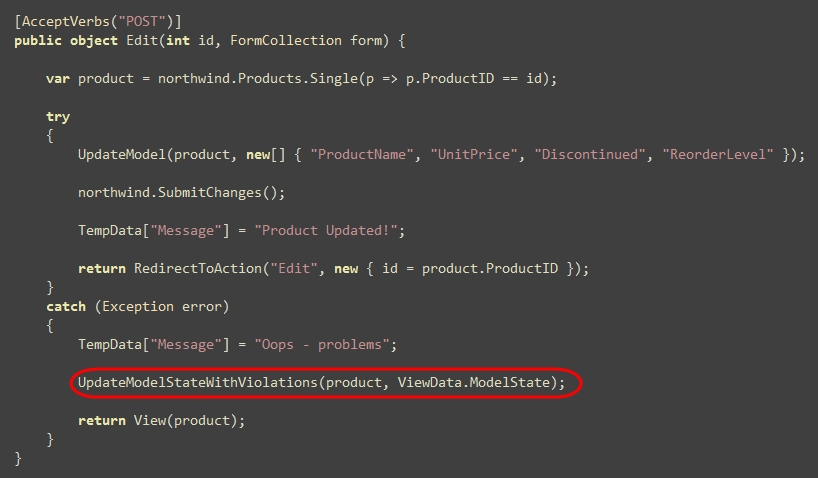
The one extra line of code we'll then add to our error catch block is some logic to call a UpdateModelStateWithViolations() helper method defined below. This method retrieves a list of all rule violations from an entity, and then updates a ModelState collection with appropriate model errors (including references to the properties on our entity object that caused them):

Once we do this, we can re-run our application. Now, in addition to seeing input format related error messages, ASP.NET MVC's validation helpers will also display our business rule violations as well.
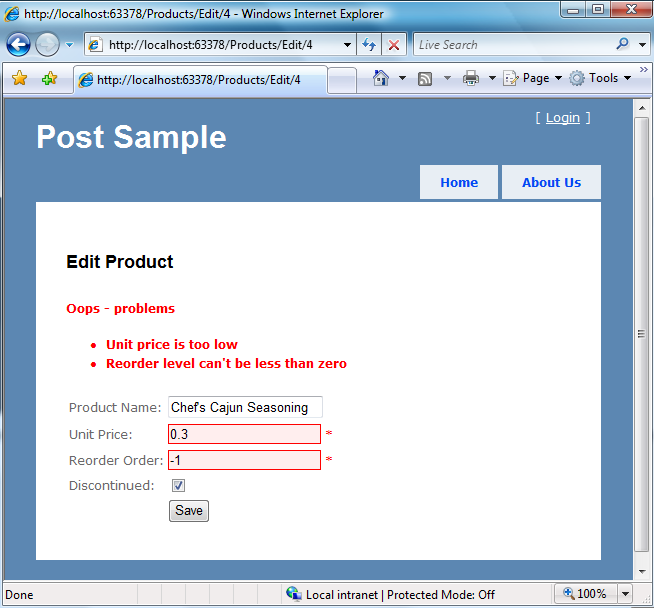
For example, we could set the unit price to be less than a $1, and try to set the Reorder level to be -1 (both values are legal from an input format perspective - but both violate our business rules). When we do this and hit save we'll see the errors show up in our Html.ValidationSummary() list, and the corresponding textboxes will be flagged:
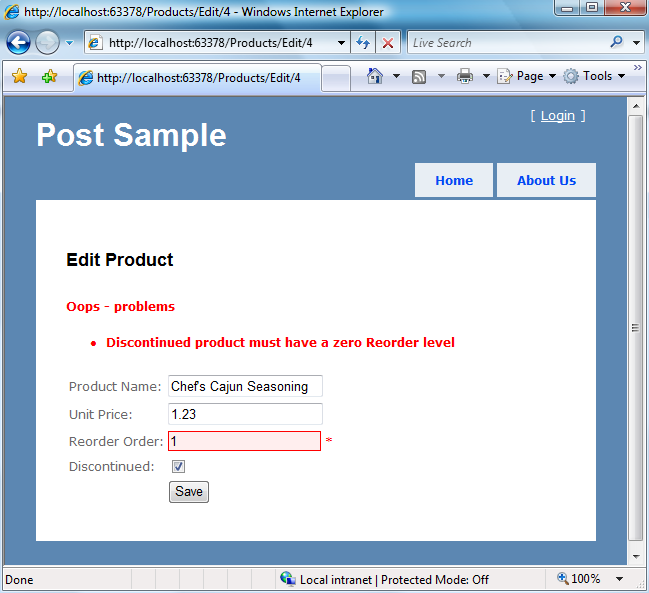
Our business rules can span multiple Product properties. For example: you might have noticed above that I added a rule that said that the reorder level can't be greater than zero if the product is discontinued:
The only changes we needed to make to our "Edit" view template throughout this entire business rules process has been to add two more Product properties (Reorder and Discontinued) to the file:
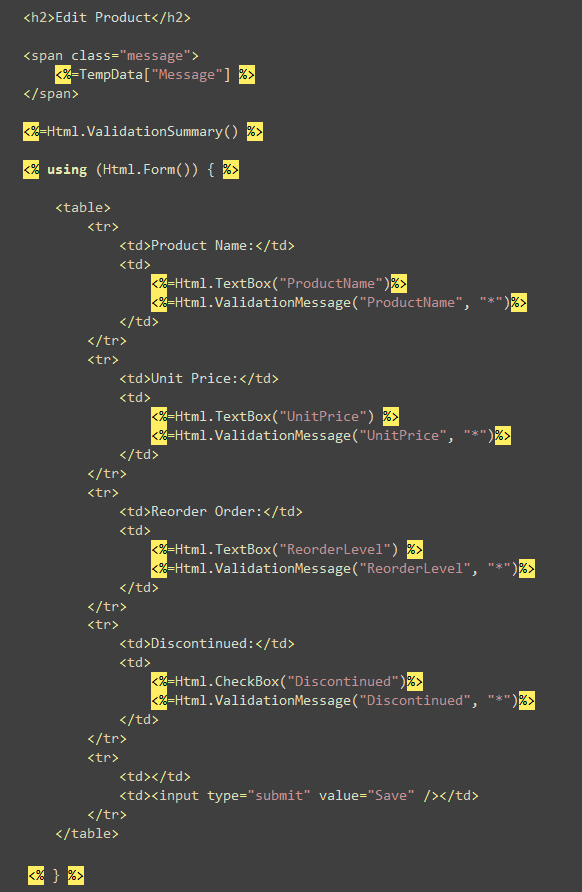
Now we can add any number of additional business validation rules we want to our Product entity, and we do not need to update the Edit view nor the ProductsController in order to have our UI support them.
We can also unit-test our model and business rules separately from our Controller and View. We can unit-test our URL routing separately from our Controller, Views and Models. And we can unit test our Controller separately from our Views. All of the scenarios shown in this blog post will support unit testing without requiring any mocking or stubbing to be used. The end result are applications that are easily testable, and which can support a nice TDD workflow.
Summary
This post has provided a quick look at how form post scenarios work with ASP.NET MVC Preview 5. Hopefully after reading it you have a better sense of how you handle form and input entry scenarios using a MVC model. You can download a completed C# version of the application I built above here. I will post a VB version a little later this week (it is unfortunately 4:30am while I'm typing this and I need to hop on a plane in a few short hours and have not started packing yet).
Important: If you don't like the MVC model or don't find it natural to your style of development, you definitely don't have to use it. It is a totally optional offering - and does not replace the existing WebForms model. Both WebForms and MVC will be fully supported and enhanced going forward (the next release of ASP.NET WebForms will add richer URL routing features, better HTML markup/client-side ID/CSS support, and more). So if after reading the above post you think "hmm - that doesn't feel natural to me", then both don't worry, and don't feel like you should or need to use it (you don't).
In my next post on MVC I'll cover how to integrate AJAX into your ASP.NET MVC applications.
Hope this helps,
Scott
Source Click Here.
No comments:
Post a Comment
Post your comments here: